Many times Internet keeps randomly disconnecting or reconnecting due to some known and unknown reasons. Recently, I suffered with same problem and it is really a matter of great frustration if your internet disconnects every now and then especially when you are to use your browser every few minutes. This internet disconnecting problem irritates usually when you open browser and internet gets disconnect in few seconds!

However, I found some new ways to get rid from this after observing the problem. There are many types of issue in disconnection of internet such as window drivers are not install correctly, router keeps disconnecting, cable modem problem or any other with so many different types of hardware and software involved.


Why Does My Internet Keeps Disconnecting?


There are several reasons behind continuously disconnecting internet but these three are the major reason of this.
  1. DSL Modem
  2. Internet Service Protocol
  3. Network Card or Wireless card
Other common causes that need checking in case your internet disconnects frequently are,
  1. There is Radio interference with your wireless signal;
  2. Your Internet Service Provider (ISP) is going through some sort of temporary outage;
  3. There may be emergency maintenance or some kind of server reset at your ISP;
  4. Layer of dust inside your dusty PC is causing overheating of chips resulting in unwanted reset of the system;
  5. The ‘default gateway’ address has abruptly altered at your ISP;
  6. ‘DNS tables’ need to be flushed for updating DNS records and name servers of your website;
  7. Dynamic reassignment of your computer’s IP address, could not be done correctly by ‘DHCP’ server;
  8. The wireless router is old and defective and needs replacement;

So, How can we fix this issue? -Suggested steps to fix this issue:


#1. CABLE OR DSL MODEM

First of all you have to check that your Modem DSL has been stable or not. If your DSL modem is keep disconnecting from internet then you have to check wiring of the modem, it may unstable due to internal problems.

To solve internal problems of DSL you have to turn off your pc and then unplug modem from the circuit and if you carry router then unplug it also. Turn off it for minimum 10 seconds and after few seconds plug it with circuit. After then, look at modem if DSL light get stable in few minutes then you can use internet if it is still blinking then it may have other fault.

Note that, If you haven’t unplug the router then other device would connect with router but disconnect with network. If you unplug both then it will reset both modem and router or it may solve your problem.


#2. INTERNET SERVICE PROTOCOL

If your internet keeps randomly disconnecting then you should have to run the ISP it would check the technical problem between line and computer.

If ISP detect the problem then it will show you suggestion to fix the connection problem.


#3. NETWORK CARD OR WIRELESS CARD

Try this method when the network is available on other devices and your computer is not connected with network.

It might be possible if you are facing unstable internet connection due to network card. There are two method to fix network card keeps disconnecting problem.

  1. Reset Network Card:- For this you have to turn off your desktop computer and open the CPU there will be a removable network card so, first remove it and then insert it into its slot.
  2. Re-install Data Card Drivers:- If you still not get solution of internet keeps disconnecting then you have to try this method.
Just go to my computer >> Device Manager and delete the network card from it and re- install window which fix some corruption or re-install drivers of network card and it makes internet stable and you can use it properly.


For Some Other Causes Try These Steps Given Below:

  • The first thing you should do is to test if you have a connection issue or a computer issue. To check this you need to connect to your network, another computer or a tablet or any Smartphone that can be connected to the same Internet connection. If you find all the devices run into same disconnection problem after connecting to the network, you have a connection issue, probably with your Cable/DSL modem, network router, or your ISP. But, if only your computer is having the problem when connected, then the issue is likely with your PC. In such a case check your PC for possible hardware failures or issues with the operating system, which can result in such Internet disconnection;
  • Your broadband modem’s connection to the Internet may once in a while become erratic due to internal programming issues, and restarting it can fix that. The same fix also occasionally works for the connection between a broadband modem and a router. In order to fix a probable cable modem or router issue, you are to reset them. To restart your broadband modem and router, turn off your computer and then unplug the power cables from the back of the modem and router and leave the modem and router off for 30 seconds (just pressing the power buttons to turn off power can at times put modems or routers into standby mode only rather than totally killing the power). Next, reconnect the modem’s power cable to restore its power. Wait a few moments for the modem to carryout self-checks and renegotiate its connection to the Internet and establish a solid link. Then plug in the power cord back to your router, wait for a few moments and then turn on your computer. Now check if the Internet connection on your PC has become steady. If not, try the next step;
  • One of the most common causes for a connection drop is your wireless Router. Unless you’re using a really old wireless Router, it’s more than likely that an old wireless card driver is the culprit. So you have to update the wireless card. Check for any available firmware upgrade of the Router by opening its interface. Update the firmware, if there is one and also update the wireless card drivers. This should solve the connection problem in most of the cases. While updating the firmware or the card driver, make sure you are retrieving the updates directly from the manufacturer’s website. Now check the Internet connection for its stability;
If the internet connection problems still persist and Internet keeps disconnecting even after trying all the above suggested steps, you may try few additional troubleshooting tips as given below to make your Internet connection stable,
  • Set Router to a Specific Channel. If you are using a router (especially a dual band router), go to the wireless settings under ‘setup’ and look for channel, and specify a channel. Use a channel other than the default and try setting a higher channel (i.e. if it was 1 change it to 2 or if it is 5 change it to 6), and if that doesn’t work, try different channels. It should work after a few goes. Never use the “auto” setting. Then save your settings. It is extremely possible that there are enough networks in your vicinity on the same channel which are conflicting with each other;
  • Sometimes your computer’s Internet Protocol settings can configure improperly or become damaged or corrupted. If your Internet connection is unstable and keeps disconnecting and you have tried all the above resolutions to the problem, resetting your TCP/IP settings might help. To reset TCP/IP manually, press Windows+R on the keyboard to open the Run window, type ‘netsh int ip reset resetlog.txt’ (without the quotes) and restart the Computer. When you run this command, it will rewrite your computer’s registry keys used for TCP/IP settings. This achieves the same result as removing and re-installing the protocol.
Make sure to create a system restore point and to backup your registry before trying this reset;
  • Power-cycle your hardware: Another thing you can try is to Power-cycle all your hardware on the network. Simply shut down all the hardware i.e. Laptop or PC, Modem, Router etc. and then power them back in the order given below. It is found that power on-off reset works and fixed connection issues most of the time if the internet keeps disconnecting intermittently:
reset router to fix if internet disconnects frequently
Modem > Router > PC (wired) -> Laptop (wireless) and see if that fixes the issue;
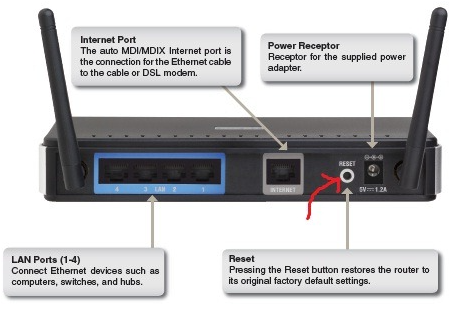
  • Reset wireless router to factory settings: Reset your router by inserting a pin in a little hole at the back of the router, and hold it down for about 10 seconds. All the lights on the front of the router would flash indicating that the router has been reset to default factory settings. After the reset, power-cycle all your hardware on the network as shown previously.
This Video will help you to understand why your internet keeps disconnecting?


If you still not get any satisfactory fix of your internet keeps disconnecting problem then drop your problem in comment or Email me, I will try my best to solve your problem.
When we look at our phone, we probably think about spending money rather than making it. Our handset almost certainly cost us a pretty penny, be it in up-front costs or in the form of an on-going contract. Thankfully there are plenty of apps to be found in Google Play to help you recoup some of the costs. This is how to make money with Android apps.


#1. Google Opinion Rewards: 

As a recap, Google Opinion Rewards is a survey app from Google that pays you for filling out short surveys. All you need to do is download and install the app, then fill out some basic info about yourself. Once you are setup, surveys randomly show up here or there focusing on a variety of topics. Some are single question surveys, while others can be four or five deep. When you complete a survey, Google will reward you with Play store credits. I can’t say that I have seen multiple-dollar rewards from a single survey, but don’t be surprised if you start building up a nice little credit pile after answering a few surveys worth $0.40 a piece.

Download Links: Google Opinion Rewards apk | Google Play store link

#2. MintCoins:

Another one is MintCoins app that helps you to earn money in a number of ways. You can gain virtual coins by downloading free apps, by watching videos, registering with websites, and referring your friends to do the same. There are also surveys to complete, and as soon as your balance hits $1, you're free to withdraw your earnings to a PayPal account -- or you can wait and let it build up for longer if you like.

It is a community owned and operated pure PoS coin. Send your mintcoins to your wallet and earn high yielding interest of up to 20% Interest the first year, 15% the second, 10% the third and 5% Interest every year thereafter as a reward for saving your coins while securing the Mintcoin network. Transactions are verified within 4 confirmations while minted coins require 50 confirmations. The community is highly supported and continues to grow with expectations for mintcoin to be around for years to come.

Download Links: MintCoins apk | Google Play store link

#3. iPoll:

The iPoll App Can Generate Serious Income for You. Google Opinion Rewards is not the only survey-based app that can be used to pull in a little cash. iPoll works in a very similar way providing you with a series of "missions" to complete. While some of these are dependent on your location, others can be completed by anyone, anywhere. In addition to traditional surveys, you may also be asked to submit photos or even upload an audio or video recording.  Many of the missions have a decent amount of money associated with then, and when you want to withdraw your earnings, you have a few options. As in other apps you can pull the money into a PayPal account, but your can also add it to your Amazon or iTunes account if you prefer.

Download Links: iPall apk | Google Play store link

#4. Earn Money:

So, The name says it here. this is an app designed to help you to earn money. If you try out the other apps mentioned here, this one might look familiar. It is all but identical to MintCoins, but you might find that the number of offers available is slightly more limited due to your location. From installing apps to watching videos, earning money really takes very little work and your rewards can be quickly transferred to a PayPal account.

Download Links: Earn Money apk | Google Play store link

#5. Rewardable:

Rewardable has a US leaning to it, but not all of the tasks you are invited to complete are reliant on being in the US. These are described as "virtual tasks" and can be completed by anyone -- so during the signup process you could simply enter a pretend zip code to get started. Rewards vary quite a lot, but are generally quite high, and your earnings can be withdrawn to PayPal easily. Should you find yourself in the States, there are in-store, location-specific tasks to carry out as well.

Download Links: Rewardable_4.1.2.apk | Google Play store Link

Unlockar:-

We lock and unlock our mobile phones dozens of times in a day. Now imagine getting reward points every time you unlock your phone. Hang on, this is no joke. Here’s an Android app, Unlockar, which lets you earn reward points in the form of uCoins which can be used to obtain deals, discounts, shopping vouchers, or even bid at auctions at the uShop, Unlockar’s online shopping portal. App is founded by Piyush Paul, Pulkit Ahuja, Gopal Yadav and Manish Garg — Unlockar offers a platform for users to stay in touch with all their social and local updates on a real time basis directly on their phones’ lock screens. In March last year, Pulkit and Piyush, ex-teammates from Standard & Poor’s Capital IQ, decided to take the entrepreneurial plunge.


 Unlockar is offering an awesome offer where you have to refer minimum 20 friends then you will get 1GB 3G data + Rs.100 Gift card of Amazon, Flipkart as per your choice.

Follow This Simple Steps To Get Rewards:-
  1. Download Unlockar App From the download links provided below.
  2. Once you download, click on Sign Up & create new account.
  3. Now on next page, it will prompt you to enter referral code.
  4. Enter this referral code to be eligible for this offer : LRN
  5. Open email and verify it.
  6. Now in the Your referral tab you will see claim bonus button click on it and click claim now.
  7. You will 500 coins for this activity, after verifying your mobile number and email id.
  8. Now note down your referral code from refer and earn and start referring your friends.
  9. Once you reach 20 referrals, send mail to Unlockar ­ ticket@unlockar.com to claim your reward.

Download Links :-

Unlocker apk (1.7 MB) | Mirror Link
Direct download 
Unlockar Google play store Link

(If the first link doesn't work than use the mirror/direct link.)


Rewards you get:-

  • 1 GB 3G Data Pack – Free No uCoins Required (Min. 20 Refers).
  • Bookmyshow Voucher Worth Rs.100 – 10100 uCoins
  • Amazon Voucher Worth Rs.50 / Rs.100 – 5100 uCoins or 10100 uCoins
  • FreeCharge Voucher Worth Rs.10 / Rs.20 / Rs.50 / Rs.100 – 2100 uCoins or 4100 uCoins or 10100 uCoins or 20100 uCoins
  • Flipkart Voucher Worth Rs.50 / Rs.100 – 5100 uCoins or 10100 uCoins
  • Mobile Recharge Worth Rs.10 / Rs.20 / Rs.50 / Rs.100 – 2100 uCoins or 4100 uCoins or 10100 uCoins or 20100 uCoins.
  • Snapdeal Voucher Worth Rs.100 – 10100 uCoins
Start referring your friends and grab this superb offer from Unlockar!


AnDOSid is an android tool, by that you can use to launch DoS attacks from your mobile phone. It was developed as a stress testing tool, but you know, anything can be misused, even a pen....

AnDOSid is so powerful, that you can even use it to take down web servers. But don't go for it, because it's one of the quick way to get into jail! The rise of groups like Anonymous and LuzSec, as well as constant India / Pakistan cyberwar has raised the issue of cyber-security high(er) in the minds of web owners.


AnDOSid fills that gap, allowing security professionals to simulate a DOS attack (An http post flood attack to be exact) and of course a dDOS on a web server, from mobile phones. AnDOSid is actively being developed and I welcome feedback from the security community as to how you would like the application to evolve.


What's in this version:


  • Requires Internet access to send the http post data
  • Requires phone state to access the IMEI (one of the two identifiers sent with each post)

How To Use AnDOSid

  1. Download AnDOSid.apk [MediaFire Link]
  2. Install it on your device.
  3. Open AnDOSid, You'll see a window something like this-


    4. Tap on the continue button. You will see the tool's main page-

    5. Enter the URL of a target website in the “Target URL” field. For example, http://facebook.com

    
    6. Edit the payload size. Default size is 1024 bytes ≈ 1Kb. If you want to increase the stress, you have to increase the payload size.
   
    7. The third box determines the number of milliseconds between each hits. Default value is 1000 milliseconds = 1 second. If you want decrease or increase the time between each hits, edit the value according to your needs.
   
    8. Tap on the “Go” button to initiate DoS attack/stress testing. Whenever you want to stop hitting, tap on the “Stop” button.


I hope you liked reading the article, if you did, feel free to share this article to your friends and followers. 


Denial of Service Attacks


Distributed Denial of Service Attack (DDoS) Definition:


A denial of service (DoS) attack is a malicious attempt to make a server or a network resource unavailable to users, usually by temporarily interrupting or suspending the services of a host connected to the Internet.

In a typical DDoS attack, the assailant begins by exploiting a vulnerability in one computer system and making it the DDoS master. The attack master, also known as the botmaster, identifies and identifies and infects other vulnerable systems with malware. Eventually, the assailant instructs the controlled machines to launch an attack against a specified target. 

Resources targeted in a DoS attack can be a specific computer, a port or service on the targeted system, an entire network, a component of a given network any system component. DoS attacks may also target human-system communications (e.g. disabling an alarm or printer), or human-response systems (e.g. disabling an important technician's phone or laptop).

DoS attacks can also target tangible system resources, such as computational resources (bandwidth, disk space, processor time); configuration information (routing information, etc.); state information (for example, unsolicited TCP session resetting). Moreover, a DoS attack can be designed to: execute malware that maxes out the processor, preventing usage; trigger errors in machine microcode or sequencing of instructions, forcing the computer into an unstable state; exploit operating system vulnerabilities to sap system resources; crash the operating system altogether.

The overriding similarity in these examples is that, as a result of the successful Denial of Service attack, the system in question does not respond as before, and service is either denied or severly limited.


Sources of Denial of Service Attacks

"If you spend more on coffee than on IT security, you will be hacked. What’s more, you deserve to be hacked.”Richard Clarke

DoS attacks are low-cost, and difficult to counter without the right tools. This makes them highly-popular even for people with technical knowledge. In fact, DoS services are offered on some web sites starting at $50. These services have grown more and more sophisticated, and can effectively exploit application vulnerabilities and evade detection by firewalls.

According to market research, DoS attacks largely originate from people with a grudge or complaint against a web site or company, competitors looking to increase market share by damaging commercial web availability, or criminal elements that systematically extort web site owners by holding his assets for ransom.

So What is the Difference Between DoS and DDoS Attack?


It is important to differentiate between Denial of Service (DoS) and Distributed Denial of Service (DDoS) attacks.

In a DoS attack, one computer and one internet connection is used to flood a server with packets, with the aim of overloading the targeted server’s bandwidth and resources.

DDoS attack, uses many devices and multiple Internet connections, often distributed globally into what is referred to as a botnet. A DDoS attack is, therefore, much harder to deflect, simply because there is no single attacker to defend from, as the targeted resource will be flooded with requests from many hundreds and thousands of multiple sources.


Types of DDoS Attacks

DDoS attacks can be divided in three types:

Volume Based Attacks
Includes UDP floods, ICMP floods, and other spoofed-packet floods. The attack’s goal is to saturate the bandwidth of the attacked site, and magnitude is measured in bits per second (Bps).
Protocol Attacks
Includes SYN floods, fragmented packet attacks, Ping of Death, Smurf DDoS and more. This type of attack consumes actual server resources, or those of intermediate communication equipment, such as firewalls and load balancers, and is measured in Packets per second.
Application Layer Attacks
Includes Slowloris, Zero-day DDoS attacks, DDoS attacks that target Apache, Windows or OpenBSD vulnerabilities and more. Comprised of seemingly legitimate and innocent requests, the goal of these attacks is to crash the web server, and the magnitude is measured in Requests per second.

Preventing Denial of Service Attacks

Rapid identification and response can prevent DoS attacks. The first challenge for any DoS protection scheme is to quickly and effectively identify incoming traffic as malicious. Once the flood of traffic is identified as a DoS attack, rather than – for example – a spike in legitimate site traffic, an effective response will generally involve setting up a scalable infrastructure to absorb the attack, until the source is identified and blocked.
A specifically targeted DDoS attack is impossible to prevent, but there are excellent and effective tools that can help mitigate the impact of such an attack.

Mitigating DoS and DDoS Damage with Incapsula

Deployed in minutes without installing hardware or software, Incapsula’s cloud-based DoS and DDoS Protection Service delivers immediate and comprehensive protection for DoS attacks, scaling on-demand to counter multi-gigabyte malicious attacks.

Incapsula’s DDoS protection Service delivers complete defence against any types of DDoS threats, including network-based attacks like SYN or UDP floods, and application attacks. Incapsula also blocks more advanced attacks that exploit application and Web server vulnerabilities, like Slowloris.

Incapsula mitigates a 250GBps DDoS attack—one of Internet's largestIncapsula mitigates a 250GBps DDoS attack—one of Internet's largest.

Unlike appliance-based DDoS protection products, that are limited by the hosting provider bandwidth capacity, Incapsula's global network of scrubbing centres scales, on demand, to counter multi-gigabyte DDoS attacks. This ensures that the mitigation is applied outside of your network, allowing only filtered traffic to reach your hosts.


Video: What are DDoS Attacks? DDoS Explained


Hi Guys, I am back with another amazing hacking tutorial. I hope you are learning well from my other posts. In this post I will be teaching you How to Hack a Wi-Fi password. The following post will teach you how to crack WiFi passwords easily in minutes.

Note: I strictly advise my readers to follow the Hacks at their own risk. I am sharing this knowledge for educational purpose only, well most of it! Blah Blah blah..

Let us start with the WiFi cracking. But before starting the tutorial let me give you a small introduction to what WiFi hacking is and what are the security protocols associated with it.

In a secured wireless connected the data on internet is sent via encrypted packets. These packets are secured with network keys.

There are basically 2 types of security keys :


  • WEP( Wireless Encryption Protocol) : This is the most basic form of encryption. This has become an unsafe option as it is vulnerable and can be cracked with relative ease. Although this is the case many people still use this encryption.
  • WPA( Wi-FI Protected Access) : This is the most secure wireless encryption. Cracking of such network requires use of a wordlist with common passwords. This is sort of brute force attack. This is virtually uncrackable if the network is secured with a strong password.


Requirements To Perform This Hack : 


Step 1: Set Up CommView for Wi-Fi

  • Download the zip file of CommView for Wi-Fi from the official website. 
  • Extract the file and run setup.exe to install CommView for Wi-Fi.
  • When CommView opens for the first time it has a driver installation guide. 
  • Follow the prompts to install the driver for your wireless card.
  • Run CommView for Wi-Fi.
  • CommView now starts scanning for wireless networks channel by channel. 
  • After a few minutes you will have a long list of wireless networks with their security type and signal.
  • This is the time to choose your target network.

Step 2: Select the Target Network and Packets

  • This tutorial is only for WEP encrypted networks, so make sure you select a network with WEP next to its name.
  • Choose a network wich has highest signal.
  • Each network will have its details in the right side of softwrae
  • Choose WEP network that has the lowest dB power value.
  • Once you have chosen your target network, select it and click Capture to start capturing packets from the desired channel.
  • Now you might notice that packets are being captured from all the networks in the particular channel. To capture packets only from the desired network follow the given steps.
  • Right click the desired network and click on copy MAC Address.
  • Switch to the Rules tab on the top.
  • On the left hand side choose MAC Addresses.
  • Enable MAC Address rules.
  • For 'Action' select 'capture' and for 'Add record' select 'both'.
  • Now paste the mac address copied earlier in the box below.
  • We need to capture only data packets for cracking.
  • select D on the bar at the top of the window and deselect M (Management packets) and C (Control packets).
  • Now you have to save the packets so that they can be cracked later.
  • Go to the logging tab on top and enable auto saving.
  • Set Maximum Directory Size to 2000.
  • Set Average Log File Size to 20.


Step 3 : Wait Until 100,000 Packets Captured

  • The amount of time taken to capture enough data packets depends on the signal and the networks usage. The minimum number of packets you should capture should be 100,000 for a decent signal.
  • Go to the log tab and click on concatenate logs.
  • Select all the logs that have been saved.
  • Do not close CommView for Wi-Fi.
  • Now navigate to the folder where the concatenated logs have been saved.
  • Open the log file.
  • Select File- Export -Wire shark tcpdump format and choose any suitable destination.
  • This will save the logs with a .cap extension to that location.
  • Step 4 : Cracking The Captured Packets Using Aircrack
  • Download Aircrack-ng and extract the zip file.
  • Open the folder and navigate to 'bin'.
  • Run Aircrack-ng GUI.
  • Choose WEP.
  • Open your .cap file that you had saved earlier.
  • Click Launch.
  • In the command prompt type in the index number of your target wireless network.
  • If everything goes fine, the wireless key will be shown.
  • You may also receive a request to try with more packets.
  • For This wait until more packets have been captured and repeat the steps to be performed after capturing packets.

If any problem comment here or you can contact me on Facebook my official page -Techdemonzs


Are you finding yourself often fighting the frustration of having your business emails getting classified as spam in your customer email boxes? No Worries, The fact is that about 85% of all emails on the internet are spam. In spite of this, businesses anticipate increasing the number of email campaigns on the web.

Recently, One of my good friend got the same issue, I saw it then searched and learnt about the Spam Filters and I'm not perfectly can say about this but It can improve your email delivery and may stop your mails being flagged as spam. So I'm posting it to here If you're having the same issues. I found, to stop this bombardment, people and businesses are creating filters, or buying company services that filter email so that they receive only content that they deem relevant to them. So, whether or not your email is legitimate, if a receiving host or email spam program is aggressive or set a certain way, your emails could very easily get marked as spam. Unfortunately, this is not a server or hosting issue. This is a general issue with email that you will find no matter where you host your business emails. This article discusses what you can do from your end.


How to Avoid Your Emails Going to Spam Folder?


  • Avoiding Your Emails Going to Spam Folder Tip No. 1: Get on the White Lists

Hotmail and Yahoo! both keep lists of approved senders. Once you're on that list, that means you'll almost always go into the inbox. If you send a particularly spammy email, however, you can be removed from the list. The process can be frustrating and take a long time, but it's well worth it.

  • Avoiding Your Emails Going to Spam Folder Tip No. 2: "Drips"the Messages

Spam filters at most email providers look to see how many messages you're sending at a time. If you're sending to a large list, even if you have a fast and efficient email sending server, have the server "drip" the messages out slowly. You really don't want more than a couple thousand to hit any one email provider per hour if you're playing it safely.

  • Avoiding Your Emails Going to Spam Folder Tip No. 3: Break Large Lists Down

There are many reasons to break large email lists down into smaller ones, but the best reason is that doing so will mean that the spam complaints that you receive when you send your email won't be in one huge mass. It is inevitable that even loyal subscribers sometimes mark you as spam. If you send your large list in smaller segments, the email provider (Hotmail, MSN, etc.) will see less spam complaints bundled together at one time.

  • Avoiding Your Emails Going to Spam Folder Tip No.. 4:"Clean" Your Email List

Most, if not all, email providers' spam filters penalize your domain or IP with a higher spam score (meaning there's a higher possibility of your emails going to junk folder) if they see that you are sending emails to bad email accounts. A bad email account is an address that doesn't exist, has been disabled or has a full inbox. These addresses should be cleaned (or "pruned") from your email list regularly to avoid this. If you allow them to add up on your list, you will eventually be flagged as a spam provider.

  • Avoiding Your Emails Going to Spam Folder Tip No. 5: Provide a Clear Unsub Link

Nobody likes it when somebody unsubscribes from their email list. However, providing a clear way to unsubscribe (and then honoring that unsub quickly) means that users are less likely to get frustrated and just mark you as spam. The number one criterion for ending up in the junk box is the number of spam complaints that you receive, so avoiding them at all costs is critical.

  • Avoiding Your Emails Going to Spam Folder Tip No. 6: Don't Sound Like a Spammer!

This one should be obvious! The more "spam-like" text and phrases your email uses, the less likely it is to end up in the inbox. There are a number of free software solutions to check the "spam score" of an email before you send it, but there are also basic rules.

  1. Don't use the word "free" too many times.
  2. Don't use ALL CAPS.
  3. Don't use lots of colored fonts.
  4. Only use one exclamation point at a time!
  5. Stay away from words you'd see in spam: Viagra, drugs, porn, guaranteed winner.

If you've seen it used in a spam message that you received, don't use it in your own email message!

Even if you do all of these things and do them perfectly, your emails may still end up in the junk folder. Email spam filter criteria change almost daily and can be impacted by things that you have no control over. However, if you, as a habit, send good email that your clients want, you'll get into the inbox more often than not. Comm100 strongly suggest you to follow the above guidelines because, once an email provider thinks that your email is spam, it is very hard to get back into the inbox!

  • Avoiding Your Emails Going to Spam Folder Tip No. 6: Don't Have Sloppy HTML Code

Spam filters check for bad html code, particularly if it looks like the code was done in Microsoft Word and then thrown into an email. Use a professional coder (preferably one who has done email templates before and knows the best way to make them resolve properly in an inbox) or a template provided by your email sending partner

  • Avoiding Your Emails Going to Spam Folder Tip No. 7: Make Sure Your DKIM, SPF, Sender-ID, and Domain Keys Are Set Up Properly

You will want to make sure your email server supports these protocols (DKIM, SPF, Sender-ID, and Domain Keys) and that they are properly implemented.
This alphabet soup helps ISPs determine the authenticity of your email from a technical perspective. To make sure yours are set up properly try using IsNotSpam.com’s checking service.
If you want to dig deeper, here are the definitions:
  1. DomainKeys Identified Mail (DKIM)
  2. Sender Policy Framework (SPF)
  3. Sender-ID
  4. Domain Keys

Bonus Tips : 

  • To avoid sending spam emails from your website, Please login to your Cpanel.In your Cpanel home select Email Authentication. Find SPF option and enable it.
  • Send your customers a personal email message requesting that they white-list your domain, so that your business emails don't get filtered into Spam. In this, I'm referring to a "personal" email as one that doesn't include your marketing links or business advertisements or enhancements that may flag the email as something other than a personal email.
  • Examine your email bounces. When an email bounces, it will tell you "why" it's being bounced and give you a source or reason for the bounce. If you're being listed on a service (that you may not be aware of), then you should investigate. In some cases, you can very easily remove yourself from a list simply contacting the authority who has blacklisted you. This may not always be the same person as the email administrator of that server. However, you can also send an email to an email administrator of the service to find out why your emails are being blocked. Though, I would only do this after examining the reason for the block and ,making sure that you have done your due diligence by reading their bounce messages and confirmed that you're not sending spam.


hash tags : Emails are going to spam, How to stop mail flagged as spam, Spam Email Filtration,  Email Marketing, Emails Going To Junk Folder, Why Is My Email Going to The Spam Folder, How do I stop my emails from being labeled as spam, How To Improve Email Delivery

Previous PostOlder Posts Home